As you write posts for your small business’ blog, you may find yourself scattered and unfocused in your writing. As a result, your content will not maintain the attention of its viewers or elicit action from them.
In order to consistently create content that stands a high chance of being appreciated, consumed and actioned, you’ll want to create and follow a specific outline for your writing every time, with few exceptions.
In this post, we will explain why outlines can be so effective, provide you with a template outline to follow, and reveal how each element of your outline should come together to create a stellar final post.
Let’s get cracking!
Why Use an Outline?
An outline is a fantastic tool for several reasons.
By using the same process for every article you write, you increase your efficiency by simplifying how long it takes to prepare for your article. This reduces decision fatigue, which enables you to focus your creative energy into writing quality content, rather than spending that energy on far less efficient process.
Additionally, a formula can be analyzed; you can determine which parts of are working (or not). This allows for tested improvement based on measurable actions.
Not to mention that whenever you practice at anything with a strategy, you get better!
Consistently using an outline will ultimately produce better articles. Better articles—that take less time to prepare for—with strong calls to action mean that you’re spending your resources more efficiently while benefitting from higher conversions for your small business.
Our Outline Template
Our outline template itself is fairly simple, and the guidelines are straightforward, as we will review in the next section.
The most important thing to bear in mind is that when the reader reads the outline for your post, it should be self-explanatory as to exactly what they can learn under each heading. The reader should be able to see what compelling value the post will offer in your outline before you actually write the post itself.
Here is our simple outline template:
- Introduction
- Main Section #1
- Main point
- Supplementary information
- Main Section #2
- Main point
- Supplementary information
- …
- Conclusion
This template can help you visualize what your outline will look like when you begin preparing for your own article.
A few notes about using this outline template before we move on:
- You can use as many sections as you need to.
- You can use subheadings within any of your sections to break them up further as appropriate. Use your judgment to decide when it is appropriate. You can read more about this later in the post.
- When you publish your article you will not include the section heading “Introduction”, rather, you will jump right into the the content itself.

Creating a Compelling Introduction
The beginning of your post should include a clearly written introduction to the content. This includes three main features.
First, outline the problem; the fear or desire that your intended reader has. As you can see from this article, the introductory sentence has outlined two problems: poor writing that doesn’t hold the readers attention which results in a frustrating and ineffective writing process.
Secondly, identify the solution to that problem. Again, using this article as an example, our solution was to use an outline.
Thirdly, you will reveal how you will provide that solution within your article in a way that compels the reader to find out what comes next. In this article, we offered to explain the solution in greater depth, provide an outline template, and provide instructions on how to use it to create stellar posts.
Writing Clear and Concise Section Headings
Depending on your post, you will likely have at least 2–3 main sections that address the solution identified in your introduction.
When you skimmed this article before reading, you probably noticed the outline we created when writing this very post:
- Why Use an Outline?
- Our Outline Template
- Creating a Compelling Introduction
- Writing Clear and Concise Section Headings
- Creating an Actionable Conclusion
- Conclusion
When you saw these headings, you already understood how you could benefit from reading this article and decided whether or not it applied to your situation. Our headings created an easy-to-scan outline.
[Tweet “The goal of section headings is to tell the reader what they’ll get by reading the article.”]
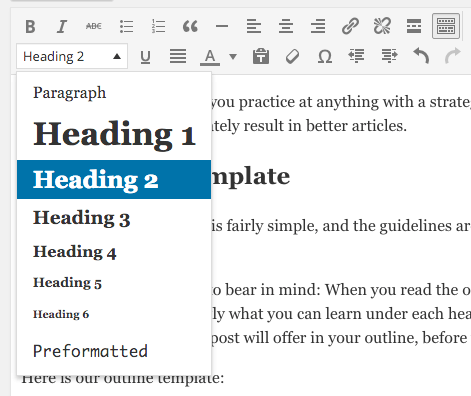
When you format your post, you’ll want to use h2 HTML tags to identify these headings (the h1 tag is reserved for the post title). If you use WordPress, selecting “Heading 2” in the formatting dropdown will do the trick.
Sometimes, you’ll tackle more complex ideas within a given section that requires more than just one simple heading. This brings us to subheadings, for which you should use the h3 tag. You can see an example of how we use subheadings under “Step 2” in this local SEO guide.
Use clear and concise section headings and subheadings from which the reader will understand what is contained within the relevant section. Eschew ‘clever’ subheadings and focus on helping the reader scan your article, because that is inevitably what they will do.
Creating an Actionable Conclusion
Your conclusion exists to offer a call to action. In order to write an effective call to action, you must:
- show the reader how to use what they’ve learned, then
- ask them to do something specific regarding that information.
You can request them to write in the comments, give you a call, send you an email, purchase a product, or whatever your goal is relative to the content of the post.
In just a moment, you’ll find yourself reading the conclusion of this very article. It will review the reason that compelled you to read more in the first place, create a succinct list of what you learned about writing outlines, and offer the next step going forward as you write articles of your own.
To craft conclusions like this yourself, you will always:
- recap the problem,
- list key action points found within the post, and
- finish with your call to action.
Conclusion
When you write blog posts for content marketing without an outline, you can easily lose sight of the message you are trying to convey. This results in a sloppy and ineffective writing process.
By using our provided outline template, then writing a compelling introduction, using straightforward and concise headings and subheadings, and writing a conclusion with a strong call for action, you will find that your writing becomes focused and your ability to convert readers into potential customers will improve. The next step is to take our outline template (or create your own) and use it every time that you write an article for your content marketing strategy.
Do you already use an outline template of your own? What have you found most successful in writing your own blog posts? Share your ideas with us in the comments section below!